Understanding the 7 stages of clay is essential for anyone diving into the world of ceramics, as it guides you through the transformation from raw earth to a beautifully finished ceramic piece. These stages, each defined by specific characteristics and processes, allow artists to shape, refine, and finally complete their creations, making every step in the journey as crucial as the next.

| Stage | Description | Key Uses |
|---|---|---|
| Dry Clay | Composed of fine particles like Ball Clay and Kaolin, it can be mixed with water. | Can be bought as powder or rehydrated from scraps. |
| Slip | A watery mixture of clay used as a glue for attaching pieces. | Attaching wet pieces, decorating, or casting in molds. |
| Plastic (Workable) | Malleable state where clay can be shaped or thrown on a pottery wheel. | Molding and shaping ceramics. |
| Leather Hard | Moist yet firm, suitable for detailed work. | Trimming, adding handles, carving, decorating. |
| Bone Dry | Fully dry and fragile, ready for firing with no remaining moisture. | Ready for bisque firing; underglaze can be applied. |
| Bisqueware | Clay has been fired once, making it rigid and porous. | Ready for glazing. |
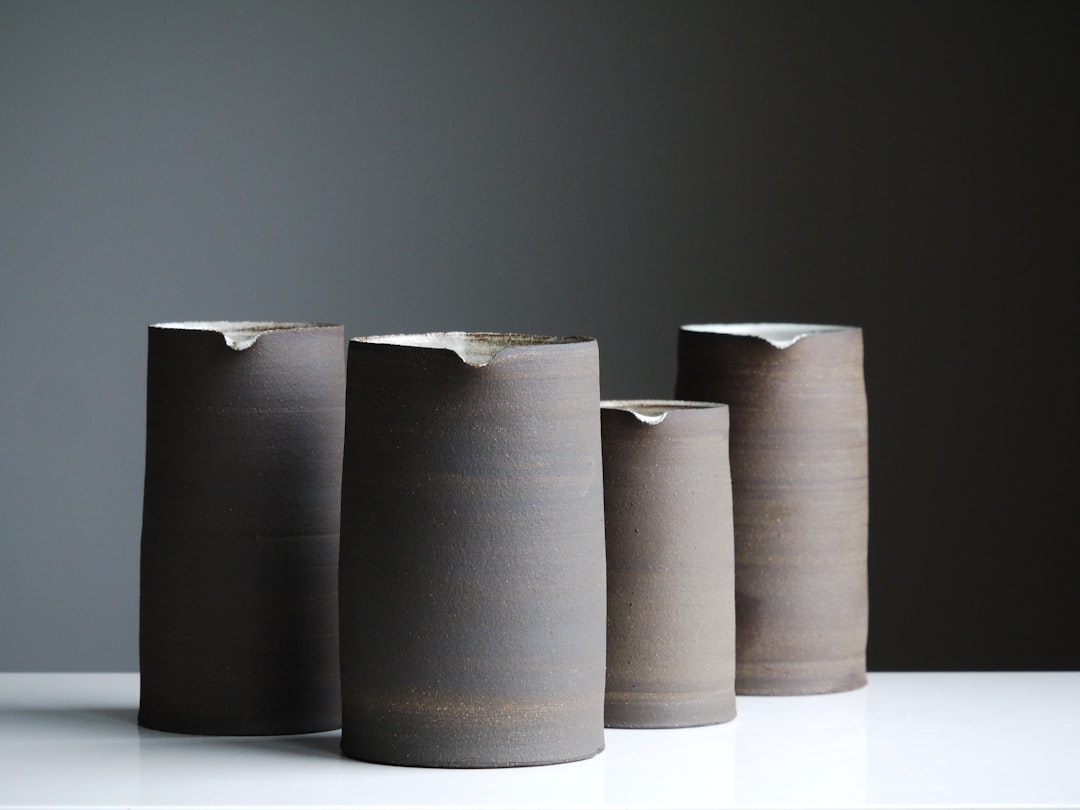
| Glazeware | Final fired stage with a non-porous, glass-like surface. | Finished pottery that can be used or sold. |
Dry Clay
Feeling ambitious to start your clay journey? Begin with dry clay, renowned for its versatility and utility. Whether you purchase it in a powdery form, rehydrate old scraps, or embark on an adventurous dig to gather your own, dry clay offers a unique start to your creative process. It consists of fine particles from varieties like Ball Clay, Kaolin, and more, providing an excellent foundation for crafting your masterpiece. Consider exploring Cranbrook Academy of Art’s ceramics department for more insights into working with clay.

Slip
Welcome to the world of slip, a silky, wet mixture that acts as a “glue” for your clay pieces. Once water is added to dry clay to create this liquid form, you can use it to attach handles, bind elements in hand-built projects, or add decorative accents. Its fluid nature makes it perfect for plaster molding too, facilitating creativity in each brushstroke or pour.
Plastic (Workable)
This is where the art truly begins! In its plastic stage, clay becomes supple and moldable, welcoming your hands or the pottery wheel to shape and form it. It’s during this phase that you can explore endless possibilities:
- Molding intricate designs
- Throwing on the wheel for symmetrical beauty
- Building basic forms ready to be honed into art
The beauty of plastic clay lies in its responsiveness, eagerly awaiting your artist’s touch. For tailored programs, the Rhode Island School of Design’s Bachelor’s program in ceramics could provide a structured path into this stage.

Leather Hard
As clay transitions to the leather hard stage, it becomes firmer but maintains enough moisture to work on details. Try your hand at adding fine embellishments, carving sophisticated patterns, or securely attaching handles and other features. This stage is divided into soft, regular, and stiff leather hard, so feel the clay as you decide when it’s ready for the next step.
Bone Dry
Here, patience pays off. As the clay reaches a bone dry state, it becomes devoid of any moisture, marking it as ready for its initial firing. It’s fragile now, but you can apply some underglaze techniques to imbue early colors and patterns. Handling with care is key, as the clay is susceptible to breakage before it’s strengthened by the kiln.
Bisqueware
Once fired and transformed into bisqueware, your piece has undergone exciting metamorphosis—it becomes firm, yet porous. Firing typically between Cone 08 and Cone 04, this stage readies your piece for glazing. The surface is now prepped to absorb the glazes that will bring your ceramic artistry to life with vibrant hues and endless creativity in glaze application.
Glazeware
The finale of your clay journey is mastering the glazeware stage. After a second firing with carefully selected glazes, the surface becomes non-porous and exudes a glossy, durable finish. The firing process melds the glaze to the body, producing rich colors and unique textures. It’s this stage where your vision culminates into a piece ready to be cherished by you or shared with the world. Interested in more professional guidance? Explore opportunities at Harvard’s ceramics program.
Are you as excited as I am to hear about your own clay creations? Share your thoughts and experiences in the comments—let’s talk about the magic of clay! Be sure to check out our recent articles for more in-depth creative content.
Enhance Your Understanding with Our YouTube Tutorial
To further solidify your grasp of the 7 stages of clay, check out the instructional video by Pottery Crafters, which provides clear demonstrations and valuable insights for beginners.
What are the 7 steps used in production of ceramics?
Ceramic production often follows seven essential steps that transform raw materials into sturdy, artful pieces. First, select and store high-quality raw materials to ensure consistency. Next, crush and mill these materials into finer particles for improved workability. Once ground, mix the clay thoroughly to achieve the perfect texture. Shape or form your clay into the desired design, then allow it to dry until it’s ready for glazing. After glazing, the final step is sintering (or firing in a kiln), where heat binds and solidifies the clay into durable ceramic ware.
What are the 8 stages of clay?
Some potters refer to an eight-stage journey of clay, highlighting each transformation. The first stage is slip, a liquid blend of clay and water used for attaching pieces or slipcasting. Next is plastic (or wet) clay, which is supple enough to shape on the wheel or by hand. When the clay partially dries but remains workable, it reaches the leather-hard stage—ideal for carving or adding handles. The fourth stage is bone dry, also called greenware, in which the clay is fully dry and ready for firing. After the first firing, it becomes bisque ware, which is stronger and ready to be glazed and fired again. Glazeware emerges from that second firing with its final glossy or matte surface. Some potters include extra transitional steps, such as final finishing or decorative processes, leading to variations in how the stages are counted.
What are the steps in clay?
The creative path of clay can be seen in six primary phases:
1) Slip – a fluid form of clay, perfect for joining pieces and slipcasting.
2) Wet clay – soft and flexible, excellent for wheel-throwing or handbuilding.
3) Leather-hard – partially dried clay, firm enough for detailing and adding attachments.
4) Bone dry – a fragile stage, also called greenware, when the clay is completely air-dried.
5) Bisque ware – after its first firing, the clay is sturdy and primed for glazing.
6) Glazeware – the final fired result, featuring a finished surface that could be shiny or matte.
What is Stage 5 of clay?
Stage 5 in the clay process typically refers to the bone dry or greenware stage. By this point, all moisture has evaporated, making the clay extremely delicate. Although you can no longer shape or carve it, it’s now perfectly prepared for its first kiln firing, which transforms the piece into bisque ware and paves the way for glazing or other final decorative touches.
Embracing the 7 stages of clay not only enhances your technical skills but also deepens your appreciation for the artistry involved in ceramics. Each phase, from wedging to firing, plays a crucial role in shaping your final masterpiece, allowing your creativity to flow seamlessly from start to finish. Whether you’re a seasoned potter or just beginning your clay journey, understanding these stages will undoubtedly enrich your crafting experience.
Stay Connected and Keep Creating
I'd love to see how you apply these stages in your own work! For more tips, inspiration, and to share your creations, feel free to follow us on Instagram. Let's continue this creative journey together and keep the passion for ceramics alive!